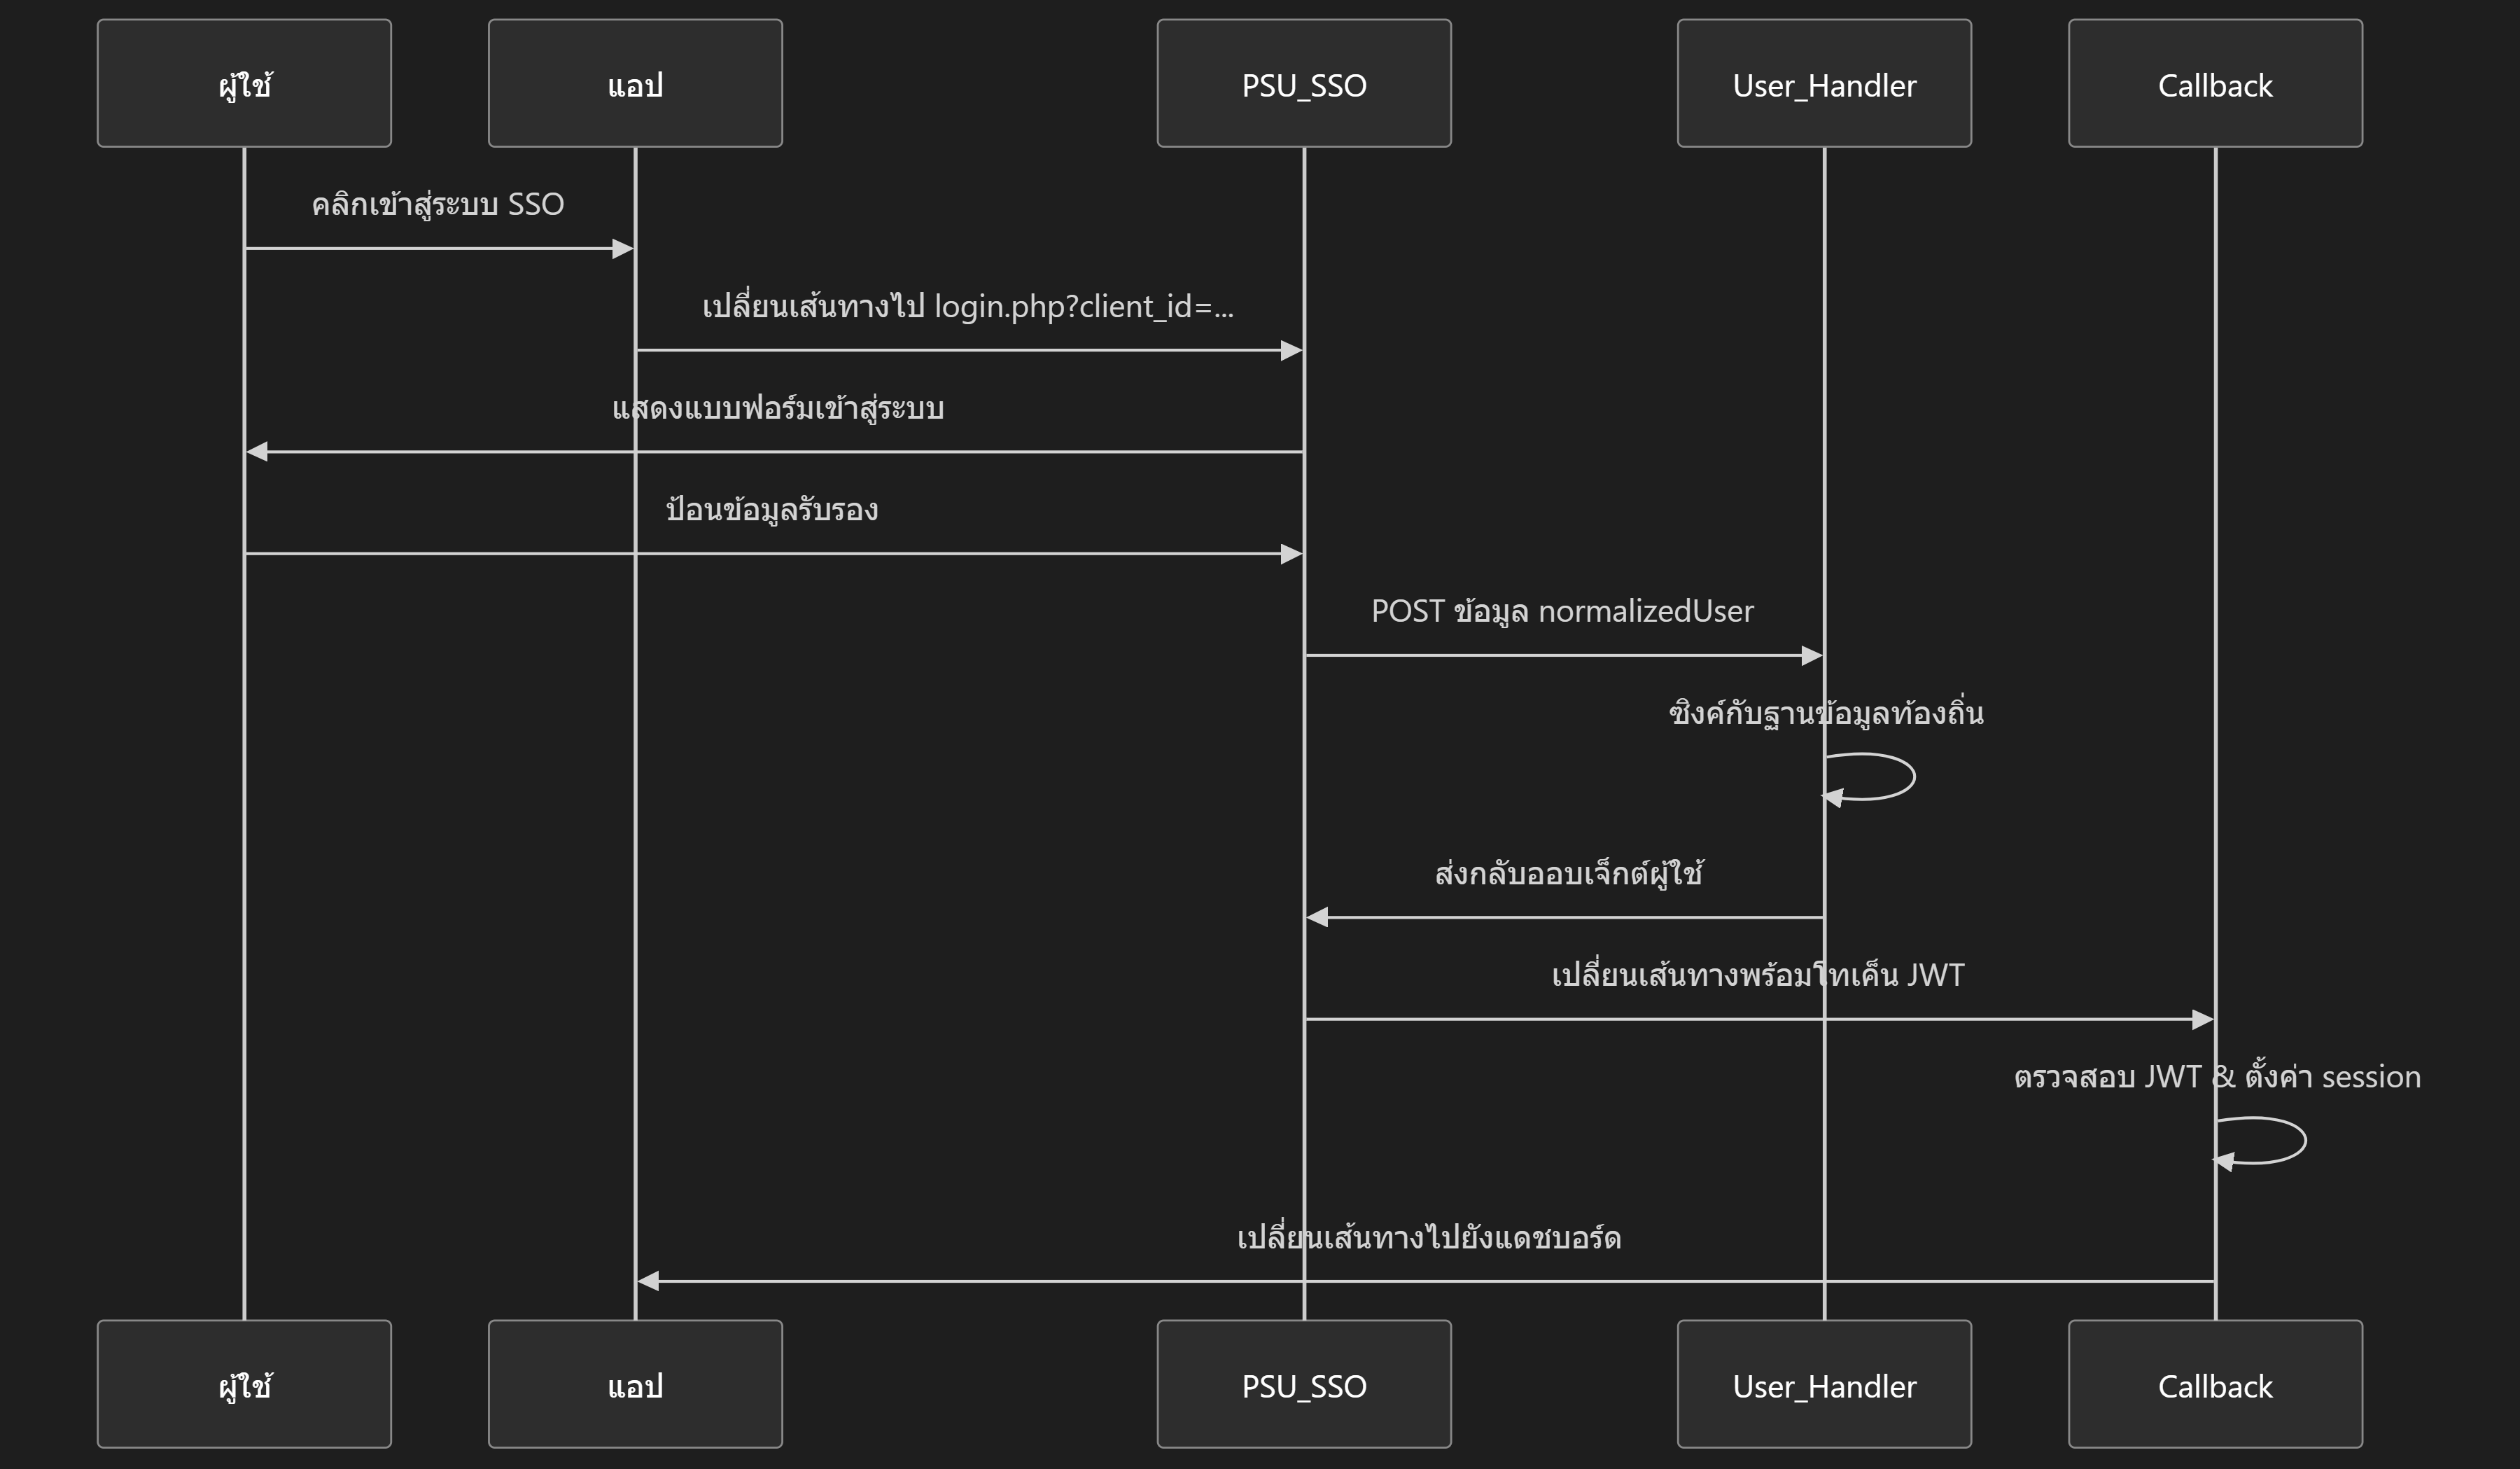
คู่มือการไมเกรท SSO-Authen เข้ากับเว็บแอปพลิเคชัน (PHP, Node.js & WordPress)
คู่มือนี้อธิบายวิธีการรวม SSO-Authen ของสำนักวิทยบริการ มหาวิทยาลัยสงขลานครินทร์ ลงในแอปพลิเคชันที่มีอยู่แล้ว โดยแทนที่การยืนยันตัวตนด้วยชื่อผู้ใช้/รหัสผ่านแบบเดิม (AD/LDAP/SOAP/OAUTH)
Technology Stack
เลือกรูปแบบการเชื่อมต่อที่เหมาะสมกับระบบของคุณ:
| Technology | ข้อดี | ข้อเสีย | เหมาะสำหรับ |
|---|---|---|---|
| PHP | • รองรับกว้าง • Hosting ง่าย • Community ใหญ่ |
• Performance ปานกลาง • Real-time จำกัด |
Traditional Web Apps |
| Node.js | • Performance สูง • Fullstack JS • Real-time ดีเยี่ยม |
• ต้องใช้ Node runtime • ใช้ Memory สูงกว่า |
Modern Web Apps, APIs, SPA |
| WordPress | • ติดตั้งง่าย (Plugin) • ไม่ต้องเขียนโค้ดเยอะ • จัดการผ่าน UI |
• ปรับแต่ง Logic ซับซ้อนได้ยากกว่า • พึ่งพา WP Core |
เว็บไซต์หน่วยงาน, Blog, CMS |
Part 1: PHP Implementation
📦 ดาวน์โหลดชุดไมเกรท (PHP)
ดาวน์โหลดชุดไมเกรท SSO-Authen ที่ตรงกับเวอร์ชัน PHP ของคุณได้จากด้านล่าง
PHP 5.6
Firebase JWT v5
สำหรับเซิร์ฟเวอร์ที่ใช้ PHP 5.6.x รองรับ legacy systems
ไฟล์ที่รวมอยู่:
- ✅ sso_callback.php (Enhanced)
- ✅ sso_user_handler.php (Enhanced)
- ✅ sso_config.php
- ✅ composer.json (JWT v5)
PHP 7.4+
Firebase JWT v6 (แนะนำ)
สำหรับเซิร์ฟเวอร์ที่ใช้ PHP 7.4+ และ PHP 8.x
ไฟล์ที่รวมอยู่:
- ✅ sso_callback.php (Enhanced)
- ✅ sso_user_handler.php (Enhanced)
- ✅ sso_config.php
- ✅ composer.json (JWT v6)
ขั้นตอนที่ 1: ลงทะเบียน Client
ให้ทำการลงทะเบียนแอปพลิเคชันของคุณเข้ากับระบบ SSO-Authen ที่ https://sso.oas.psu.ac.th
| รายการ | ตัวอย่าง | การใช้งาน |
|---|---|---|
| Client ID | client_xxx |
พารามิเตอร์ URL การเข้าสู่ระบบ |
| API Secret Key | xxxxxxx... |
การยืนยัน API ของ User Handler *กรุณาเก็บไว้เป็นความลับ |
| JWT Secret Key | xxxxxxx... |
การตรวจสอบ JWT ของ Callback *กรุณาเก็บไว้เป็นความลับ |
ขั้นตอนที่ 2: สร้างไฟล์ SSO Config
สร้างไฟล์:
includes/sso_config.php
(ไฟล์นี้ใช้ได้กับทั้ง PHP 5.6 และ 7.4+)
<?php
/**
* SSO Configuration Template
* Prefer loading secrets from environment variables in production.
*/

// URL ของผู้ให้บริการ SSO
define('SSO_LOGIN_URL', 'https://sso.oas.psu.ac.th/public/login.php');
define('SSO_LOGOUT_URL', 'https://sso.oas.psu.ac.th/public/logout.php');

// Credential ที่ได้รับจากการลงทะเบียน client
define('SSO_CLIENT_ID', 'YOUR_CLIENT_ID_HERE');
define('SSO_API_SECRET', 'YOUR_API_SECRET_HERE');
define('SSO_JWT_SECRET', 'YOUR_JWT_SECRET_HERE');

// URL ของแอปพลิเคชัน
define('APP_BASE_URL', 'https://your-domain.example');
define('APP_CALLBACK_URL', APP_BASE_URL . '/sso_callback.php');
define('APP_USER_HANDLER_URL', APP_BASE_URL . '/sso_user_handler.php');
define('APP_HOME_URL', APP_BASE_URL . '/index.php');

// การกำหนดค่าฐานข้อมูล
define('DB_HOST', 'localhost');
define('DB_USER', 'root');
define('DB_PASS', 'password');
define('DB_NAME', 'dbname');

// การกำหนดค่า Role ประกอบด้วยชื่อคอลัมน์ในตารางผู้ใช้ และสิทธิ์เริ่มต้นสำหรับผู้ใช้ใหม่
define('SSO_ROLE_COLUMN', 'user_role');
define('SSO_DEFAULT_ROLE', 'user');

// หมายเหตุความปลอดภัย: ใน Production ให้ย้ายความลับไปยัง environment
// define('SSO_API_SECRET', getenv('SSO_API_SECRET'));
// define('SSO_JWT_SECRET', getenv('SSO_JWT_SECRET'));
?>
ขั้นตอนที่ 3: ติดตั้ง Composer
เลือกเวอร์ชัน
composer.json ตาม PHP version
ของ Server แล้วติดตั้งด้วยคำสั่ง
composer install
หรือใช้โฟลเดอร์ /vendor ที่เตรียมไว้ให้
สำหรับ PHP 5.6
{
  "require": {
    "firebase/php-jwt": "^5.2"
  },
  "config": {
    "platform": {
      "php": "5.6.40"
    }
  }
}
สำหรับ PHP 7.4+
{
  "require": {
    "firebase/php-jwt": "^6.0"
  },
  "config": {
    "platform": {
      "php": "7.4.33"
    }
  }
}
ขั้นตอนที่ 4a: สร้างไฟล์ User Handler Endpoint
สร้างไฟล์:
sso_user_handler.php
ที่ Root Directory
<?php
/**
* SSO User Handler - Template for PHP 7.4+
* - Enhanced with comprehensive error handling
*/

// Enable error logging
error_reporting(E_ALL);
ini_set('display_errors', 0);
ini_set('log_errors', 1);
ini_set('error_log', __DIR__ . '/sso_error.log');

require_once __DIR__ . '/sso_config.php';
header('Content-Type: application/json; charset=utf-8');

try {
    // Verify API secret
    $api_secret = null;
    if (!empty($_SERVER['HTTP_X_API_SECRET'])) {
        $api_secret = $_SERVER['HTTP_X_API_SECRET'];
    } elseif (!empty($_SERVER['HTTP_AUTHORIZATION'])) {
        if (preg_match('/Bearer\s+(\S+)/', $_SERVER['HTTP_AUTHORIZATION'], $m)) {
            $api_secret = $m[1];
        }
    }

    if ($api_secret !== SSO_API_SECRET) {
        error_log('SSO User Handler: Unauthorized access attempt');
        http_response_code(401);
        echo json_encode(['error' => 'Unauthorized']);
        exit;
    }

    $input = file_get_contents('php://input');
    $data = json_decode($input, true);
    $normalized = $data['normalizedUser'] ?? null;

    if (!$normalized) {
        error_log('SSO User Handler: Missing normalizedUser in request');
        http_response_code(400);
        echo json_encode(['error' => 'Missing normalizedUser']);
        exit;
    }

    $sso_id = $normalized['id'] ?? null;
    $email = $normalized['email'] ?? null;
    $name = $normalized['name'] ?? null;

    if (!$sso_id || !$email) {
        error_log('SSO User Handler: Missing id or email');
        http_response_code(400);
        echo json_encode(['error' => 'Missing id or email']);
        exit;
    }

    // Connect to DB with error handling
    $conn = mysqli_connect(DB_HOST, DB_USER, DB_PASS, DB_NAME);
    if (!$conn) {
        error_log('SSO User Handler: DB Connection Error - ' . mysqli_connect_error());
        http_response_code(500);
        echo json_encode(['error' => 'DB connection failed']);
        exit;
    }

    // Set charset to UTF-8
    mysqli_set_charset($conn, 'utf8mb4');

    $table = 'staff';

    // Find existing user
    $q = "SELECT id, staff_email, staff_name, sso_id, " . SSO_ROLE_COLUMN . " as user_role
          FROM $table WHERE staff_email = ? OR sso_id = ? LIMIT 1";

    $stmt = $conn->prepare($q);
    if (!$stmt) {
        error_log('SSO User Handler: Prepare Error - ' . $conn->error);
        http_response_code(500);
        echo json_encode(['error' => 'Database query preparation failed']);
        exit;
    }

    $stmt->bind_param('ss', $email, $sso_id);
    if (!$stmt->execute()) {
        error_log('SSO User Handler: Execute Error - ' . $stmt->error);
        http_response_code(500);
        echo json_encode(['error' => 'Database query execution failed']);
        exit;
    }

    $res = $stmt->get_result();
    $user_role = SSO_DEFAULT_ROLE;

    if ($res && $res->num_rows > 0) {
        $row = $res->fetch_assoc();
        $user_id = $row['id'];
        $user_role = $row['user_role'] ?? SSO_DEFAULT_ROLE;

        // Update record
        $uq = "UPDATE $table SET sso_id = ?, staff_name = ? WHERE id = ?";
        $ust = $conn->prepare($uq);
        if ($ust) {
            $ust->bind_param('ssi', $sso_id, $name, $user_id);
            $ust->execute();
        }
    } else {
        // Auto-create new user
        $iq = "INSERT INTO $table (sso_id, staff_email, staff_name, " . SSO_ROLE_COLUMN . ") VALUES (?, ?, ?, ?)";
        $ist = $conn->prepare($iq);
        if ($ist) {
            $ist->bind_param('ssss', $sso_id, $email, $name, SSO_DEFAULT_ROLE);
            if ($ist->execute()) {
                $user_id = $conn->insert_id;
                error_log('SSO User Handler: New user created - ID: ' . $user_id);
            } else {
                error_log('SSO User Handler: Insert Error - ' . $ist->error);
                http_response_code(500);
                echo json_encode(['error' => 'Failed to create new user']);
                exit;
            }
        }
    }

    $stmt->close();
    $conn->close();

    // Return user object with role information
    echo json_encode([
        'id' => (string)$user_id,
        'email' => $email,
        'name' => $name,
        'role' => $user_role
    ], JSON_UNESCAPED_UNICODE);  // Add JSON_UNESCAPED_UNICODE for Thai characters

} catch (Exception $e) {
    error_log('SSO User Handler Exception: ' . $e->getMessage());
    http_response_code(500);
    echo json_encode(['error' => 'Internal server error', 'message' => $e->getMessage()]);
}
?>ขั้นตอนที่ 4b: สร้างไฟล์ Callback Endpoint
สร้างไฟล์:
sso_callback.php
ที่ Root Directory
<?php
/**
* SSO Callback - PHP 7.4+ (firebase/php-jwt v6)
* - Enhanced with comprehensive error handling
*/

// Enable error logging
error_reporting(E_ALL);
ini_set('display_errors', 0);
ini_set('log_errors', 1);
ini_set('error_log', __DIR__ . '/sso_error.log');

try {
    require_once __DIR__ . '/sso_config.php';
    session_start();

    $jwt = $_GET['token'] ?? null;
    if (!$jwt) {
        error_log('SSO Callback: No token provided');
        die('No token provided');
    }

    $payloadArr = null;
    if (file_exists(__DIR__ . '/vendor/autoload.php')) {
        require_once __DIR__ . '/vendor/autoload.php';
        try {
            $decoded = \Firebase\JWT\JWT::decode($jwt, new \Firebase\JWT\Key(SSO_JWT_SECRET, 'HS256'));
            $payloadArr = (array)$decoded;
        } catch (Exception $e) {
            error_log('SSO Callback JWT Error: ' . $e->getMessage());
            die('Invalid token: ' . $e->getMessage());
        }
    } else {
        // Basic decode without signature validation (Dev only!)
        $parts = explode('.', $jwt);
        if (count($parts) !== 3) {
            error_log('SSO Callback: Invalid JWT format');
            die('Invalid JWT format');
        }
        $payloadArr = json_decode(base64_decode(str_replace(array('-', '_'), array('+', '/'), $parts[1])), true);
        if (!$payloadArr) {
            error_log('SSO Callback: Invalid JWT payload');
            die('Invalid JWT payload');
        }
    }

    // Extract user data
    $data = $payloadArr['data'] ?? null;

    // CRITICAL: Convert object to array to prevent "Cannot use object as array" error
    if (is_object($data)) {
        $data = (array)$data;
    }

    if (!$data || !is_array($data)) {
        error_log('SSO Callback: Invalid data object');
        die('Invalid JWT payload (missing or invalid data object)');
    }

    $user_id = $data['id'] ?? null;
    $username = $data['email'] ?? null;
    $display = $data['name'] ?? null;
    $user_role = $data['role'] ?? 'user';  // Fallback to 'user' if role not provided

    if ($user_id === null || $username === null || $user_id === '' || $username === '') {
        error_log('SSO Callback: Missing user data - ' . print_r($data, true));
        die('Invalid JWT payload (missing user id or email in data)');
    }

    // Set session keys compatible with legacy app
    $_SESSION['LOGIN'] = 1;
    $_SESSION['USERNAME'] = $username;
    $_SESSION['USER_ID'] = $user_id;
    $_SESSION['USER_NAME'] = $display;
    $_SESSION['USER_ROLE'] = $user_role;
    $_SESSION['SSO_JWT'] = $jwt;

    // Log successful login for debugging
    error_log('SSO Callback Success: User ' . $user_id . ' logged in');

    $redirect = $_SESSION['original_url'] ?? 'manage/index.php?Login=True';
    unset($_SESSION['original_url']);
    header('Location: ' . $redirect);
    exit;

} catch (Exception $e) {
    error_log('SSO Callback Exception: ' . $e->getMessage() . ' at ' . $e->getFile() . ':' . $e->getLine());
    die('Error processing SSO login: ' . $e->getMessage());
}
?>ขั้นตอนที่ 5: อัปเดต UI
สร้างปุ่มเข้าสู่ระบบ (header.php)
<?php
require_once 'includes/sso_config.php';

// ... โค้ดเดิมที่มีอยู่ ...

if (isset($_SESSION['LOGIN']) && $_SESSION['LOGIN'] == 1) {
    // ผู้ใช้ได้เข้าสู่ระบบแล้ว
    echo '<div class="user-menu">';
    echo 'ยินดีต้อนรับ ' . htmlspecialchars($_SESSION['USERNAME']);

    // แสดงเมนูตามสิทธิ์
    $user_role = isset($_SESSION['USER_ROLE']) ? $_SESSION['USER_ROLE'] : 'user';

    if ($user_role === 'admin') {
        echo ' | <a href="/admin/users.php">จัดการผู้ใช้</a>';
    } elseif ($user_role === 'manager') {
        echo ' | <a href="/manager/reports.php">รายงาน</a>';
    }

    echo ' | <a href="logout.php">ออกจากระบบ</a>';
    echo '</div>';
} else {
    // ผู้ใช้ยังไม่ได้เข้าสู่ระบบ - แสดงปุ่ม SSO login
    $login_url = SSO_LOGIN_URL . '?client_id=' . urlencode(SSO_CLIENT_ID)
              . '&redirect_uri=' . urlencode(APP_CALLBACK_URL);

    echo '<div class="login-section">';
    echo '<a href="' . $login_url . '" class="btn btn-primary">เข้าสู่ระบบด้วย PSU SSO</a>';
    echo '</div>';
}
?>
ปรับปรุงลิงค์การออกจากระบบ (logout.php)
<?php
require_once 'includes/sso_config.php';
session_start();
session_destroy();

// Redirect ไปหน้า Logout ของ SSO
$logout_url = SSO_LOGOUT_URL . '?post_logout_redirect_uri='
            . urlencode('https://' . $_SERVER['HTTP_HOST'] . '/index.php');

header('Location: ' . $logout_url);
exit;
?>
ขั้นตอนที่ 6: ปรับปรุงฐานข้อมูล (ตารางผู้ใช้) ให้สอดคล้องกับระบบ
-- เพิ่มคอลัมน์สำหรับ SSO และ Role เข้าไปในตาราง staff (หรือตารางผู้ใช้เดิมของคุณ)
ALTER TABLE staff
  ADD COLUMN sso_id VARCHAR(100) UNIQUE,
  ADD COLUMN staff_email VARCHAR(100),
  ADD COLUMN user_role VARCHAR(50) DEFAULT 'user',
MODIFY staff_name VARCHAR(255);ขั้นตอนที่ 7: การทดสอบ (Testing)
ทดสอบยิง Request ไปยัง User Handler (จำลองการเรียกจาก SSO Server)
curl -X POST https://your-domain/sso_user_handler.php \
  -H "X-API-SECRET: YOUR_API_SECRET" \
  -H "Content-Type: application/json" \
  -d '{
    "normalizedUser": {
      "id": "12345",
      "email": "test@psu.ac.th",
      "name": "Test User"
    }
}'role ตอบกลับมาด้วย
{
  "id": "1",
  "email": "test@psu.ac.th",
  "name": "Test User",
  "role": "user"  <-- ตรวจสอบว่ามีบรรทัดนี้เพื่อยืนยันสิทธิ์
}
🛠️ การแก้ไขปัญหา
| ปัญหา | สาเหตุ | วิธีแก้ |
|---|---|---|
| "Did not receive user data" | User Handler ไม่ได้รับเรียกหรือรูปแบบการตอบสนองผิด |
ตรวจสอบ API secret ตรงกัน
ตรวจสอบให้แน่ใจว่าการตอบสนองมีฟิลด์
id
|
| "Invalid token" ที่ callback | ความไม่ตรงกันของลายเซ็น JWT | ตรวจสอบว่า JWT_SECRET ตรงกับคีย์ของผู้ให้บริการ SSO |
| Session ไม่สร้างหลังการเข้าสู่ระบบ | Callback ไม่ตั้งคีย์ session |
ตรวจสอบคีย์ session: $_SESSION['LOGIN'] และ
$_SESSION['USERNAME']
|
| User Handler ส่งกลับ 401 | ไม่ได้ส่ง API secret หรือผิด |
ตรวจสอบว่า X-API-SECRET header ตรงกับ
SSO_API_SECRET
|
| ออกจากระบบไม่เปลี่ยนเส้นทางไปยัง SSO | การกำหนดค่า LOGOUT_URL ผิด | ตรวจสอบ URL ตรงกับ endpoint การออกจากระบบของผู้ให้บริการ SSO |
| Role ไม่แสดงใน UI | Session ไม่มี $_SESSION['USER_ROLE'] |
ตรวจสอบว่า callback ตั้งค่า role ถูกต้อง และ JWT มีข้อมูล role |
| ผู้ใช้ใหม่ได้สิทธิ์ไม่ถูกต้อง | ตาราง roles หรือ default role ไม่ถูกต้อง | ตรวจสอบว่ามี role 'user' ในตาราง roles และ user handler กำหนดสิทธิ์ถูกต้อง |
| HTTP 500 แบบไม่มี error message | ไม่มี error logging หรือ try-catch |
ตรวจสอบไฟล์ sso_error.log และดูว่ามี error
อะไรบันทึก
|
| Fatal error: Cannot use object as array | ไม่แปลง object เป็น array |
เพิ่ม
if (is_object($data)) { $data = (array)$data; }
ใน callback
|
📝 หมายเหตุสำคัญ
การปรับปรุงเทมเพลต (Enhanced Template)
การปรับปรุงหลัก 7 ข้อ:
sso_error.log
ประโยชน์ที่ได้รับ:
- ✅ ป้องกัน HTTP 500 แบบไม่มี error message
- ✅ Debug ได้ง่ายด้วย error log
- ✅ รองรับภาษาไทยและ Unicode
- ✅ ไม่มี silent failure
- ✅ มี audit trail สำหรับ login/unauthorized access
วิธีตรวจสอบ Error Log
# ดู error log แบบ real-time
tail -f sso_error.log

# หรือใน Windows PowerShell
Get-Content sso_error.log -Wait -Tail 20
ตัวอย่าง log ที่คาดหวัง:
SSO Callback Success: User 123 logged in
SSO User Handler: New user created - ID: 456
ตัวอย่าง error:
SSO Callback: No token provided
SSO Callback JWT Error: Expired token
SSO User Handler: Unauthorized access attempt
SSO User Handler: DB Connection Error
Part 2: Node.js Implementation
📦 ดาวน์โหลดชุดไมเกรท (Node.js)
ชุดไมเกรทสำหรับ Node.js แบบ Stateful (Express Session)
ขั้นตอนที่ 1: เตรียมโปรเจกต์
สร้างโฟลเดอร์โปรเจกต์และติดตั้ง Dependencies ที่จำเป็น
สำหรับ Web App ทั่วไปที่ต้องการ Session Management
npm init -y
npm install express express-session jsonwebtoken axios dotenv body-parser mysql2ขั้นตอนที่ 2: ตัวแปรสภาพแวดล้อม (Environment Variables)
สร้างไฟล์ .env ที่ Root Directory
# .env
PORT=3000
NODE_ENV=development

# SSO Configuration
SSO_LOGIN_URL=https://sso.oas.psu.ac.th/public/login.php
SSO_LOGOUT_URL=https://sso.oas.psu.ac.th/public/logout.php
SSO_CLIENT_ID=YOUR_CLIENT_ID
SSO_API_SECRET=YOUR_API_SECRET
SSO_JWT_SECRET=YOUR_JWT_SECRET

# App URLs
APP_BASE_URL=http://localhost:3000
APP_CALLBACK_URL=/sso_callback
APP_USER_HANDLER_URL=/sso_user_handler

# Database
DB_HOST=localhost
DB_USER=root
DB_PASS=password
DB_NAME=psu_sso_db

# Session (Stateful Only)
SESSION_SECRET=your-secret-key
ขั้นตอนที่ 3: สร้าง Server
ตัวอย่างโค้ด server.js สำหรับจัดการ Authentication
require("dotenv").config();
const express = require("express");
const session = require("express-session");
const jwt = require("jsonwebtoken");
const mysql = require("mysql2/promise");
const app = express();

// 1. Setup Session
app.use(session({
secret: process.env.SESSION_SECRET,
resave: false,
saveUninitialized: false,
cookie: { httpOnly: true }
}));

// 2. Database Pool
const pool = mysql.createPool({
host: process.env.DB_HOST,
user: process.env.DB_USER,
password: process.env.DB_PASS,
database: process.env.DB_NAME
});

// 3. User Handler (Called by SSO Server)
app.post(process.env.APP_USER_HANDLER_URL, express.json(), async (req, res) => {
const apiSecret = req.headers["x-api-secret"];
if (apiSecret !== process.env.SSO_API_SECRET) {
    return res.status(401).json({ error: "Unauthorized" });
}

const { normalizedUser } = req.body;
// ... Logic to Insert/Update User in DB ...
// See full code in NodeJS.zip

res.json({ id: "1", role: "user" }); // Mock response
});

// 4. Callback (Called by Browser after Login)
app.get(process.env.APP_CALLBACK_URL, (req, res) => {
const token = req.query.token;
try {
    const decoded = jwt.verify(token, process.env.SSO_JWT_SECRET);
    // Save User to Session
    req.session.user = decoded.data;
    res.redirect("/");
} catch (err) {
    res.status(400).send("Invalid Token");
}
});

app.get("/", (req, res) => {
if (req.session.user) {
    // Escape HTML tags
    res.send(`Hello ${req.session.user.name} <a href="/logout">Logout</a>`);
} else {
    // Generate Login Link
    const loginUrl = `${process.env.SSO_LOGIN_URL}?client_id=${process.env.SSO_CLIENT_ID}&redirect_uri=${process.env.APP_BASE_URL}${process.env.APP_CALLBACK_URL}`;
    // Escape HTML tags
    res.send(`<a href="${loginUrl}">Login with PSU SSO</a>`);
}
});

app.listen(3000, () => console.log("Server running on port 3000"));ขั้นตอนที่ 4: สั่งรัน Gateway (CLI)
คำสั่ง Command Line สำหรับรันเซิร์ฟเวอร์ในโหมดต่างๆ
สำหรับการทดสอบและพัฒนา (Development)
# ติดตั้ง dependencies (ถ้ายังไม่ได้ทำ)
npm install

# รันด้วย node ปกติ
node server.js

# หรือถ้าใช้ nodemon (แนะนำสำหรับ dev)
npx nodemon server.jsPart 3: WordPress Implementation
📦 ดาวน์โหลด Plugin (WordPress)
PSU SSO-Authen Plugin
- ✅ WordPress 5.0 ขึ้นไป (แนะนำ)
- ✅ PHP 7.4 หรือใหม่กว่า (รองรับ PHP 8)
- ✅ เว็บไซต์ต้องใช้งานผ่าน HTTPS เท่านั้น
ขั้นตอนที่ 1: ติดตั้ง Plugin
วิธีติดตั้งผ่านหน้า Admin
- เข้าสู่ระบบ WordPress Admin
- ไปที่เมนู Plugins > Add New (ปลั๊กอิน > เพิ่มปลั๊กอินใหม่)
- คลิกปุ่ม Upload Plugin (อัปโหลดปลั๊กอิน) ด้านบน
- เลือกไฟล์
psu-sso-authen.zipและกด Install Now (ติดตั้งตอนนี้) - กด Activate (ใช้งาน) ปลั๊กอิน
ขั้นตอนที่ 2: ลงทะเบียนและตั้งค่า Config
ลงทะเบียนเว็บไซต์ของคุณที่ https://sso.oas.psu.ac.th โดยใช้ URL ดังนี้:
จากนั้นเพิ่มค่าคงที่ (Constants) ลงในไฟล์ wp-config.php (วางไว้ก่อนบรรทัด /* That's all, stop editing! */)
/** PSU SSO Gateway Configuration */
define('PSU_SSO_CLIENT_ID', 'ระบุ_Client_ID_ของคุณที่นี่');
define('PSU_SSO_API_SECRET', 'ระบุ_API_Secret_Key_ของคุณที่นี่');
define('PSU_SSO_JWT_SECRET', 'ระบุ_JWT_Secret_Key_ของคุณที่นี่');

// Optional Settings
// define('PSU_SSO_DISABLE_REGISTRATION', true); // ปิดรับสมาชิกใหม่
// define('PSU_SSO_HIDE_DEFAULT_FORM', true); // ซ่อนฟอร์ม Login เดิม
ขั้นตอนที่ 3: การจัดการสิทธิ์ (Roles)
👤 สิทธิ์เริ่มต้น
ผู้ใช้ใหม่ที่ Login ครั้งแรกจะได้รับสิทธิ์เป็น Subscriber โดยอัตโนมัติ
🔧 Custom Redirect
ใช้ Filter Hook เพื่อกำหนดหน้าปลายทางหลัง Login แยกตาม Role
add_filter('psu_sso_login_redirect_url',
function($url, $user) {
    if (in_array('shop_manager', $user->roles)) {
        return home_url('/shop/');
    }
    return $url;
}, 10, 2);
🛠️ การแก้ไขปัญหา (WordPress)
| ปัญหา | วิธีแก้ไข |
|---|---|
| Missing Configuration | ตรวจสอบไฟล์ wp-config.php ว่าใส่ค่าคงที่ครบ 3 ตัวหรือไม่ |
| Invalid Token / User not found |
1. ตรวจสอบ JWT Secret2. ตรวจสอบ URL User Handler ในระบบ SSO 3. เปิดไฟล์ debug.log ในโฟลเดอร์ปลั๊กอิน
|
| Login แล้วไม่ไปหน้า Admin | ปลั๊กอินจะ Redirect เฉพาะ Administrator ไปหน้า Dashboard ส่วน Role อื่นจะไปหน้าแรก (แก้ไขได้ด้วย Hook) |
🖧 โครงสร้างไฟล์หลังการติดตั้ง
PHP Project
project-root/
├── sso_callback.php
├── sso_user_handler.php
├── composer.json
├── vendor/
├── includes/
│   ├── sso_config.php
│   ├── header.php
│   └── auth_functions.php
└── admin/
    └── logout.php
Node.js Project
nodejs-app/
├── server.js
├── package.json
├── .env
├── database.sql
└── [logs and other files]
WordPress
wp-content/plugins/
└── psu-sso-authen/
    ├── psu-sso-authen.php
    ├── psu-sso-authen.js
    ├── readme.md
    └── ...